Create a child theme in WordPress is an essential skill for anyone looking to customize their website while preserving the integrity of the parent theme. Whether you’re a developer or a beginner, a child theme allows you to make changes safely, ensuring that your modifications won’t be lost when the parent theme is updated.
In this blog post, we’ll walk you through the process of creating a child theme using a plugin called Child Theme Configurator. This is a simple and efficient way to get your child’s theme up and running without writing a single line of code. We’ll also compare creating a child theme manually so you can choose the method that best suits your needs.
Watch the full tutorial on YouTube! – https://www.youtube.com/watch?v=49Zb1JN1PGA&t=13s
What You’ll Learn:
- What is a child theme and why it’s important
- Step-by-step instructions on how to create a child theme using a plugin
- Where to place images to make the blog visually engaging
- Comparison between creating a child theme with and without a plugin
What is a Child Theme?
A child theme is a sub-theme that inherits all the functionality and design of a parent theme. The key benefit of using a child theme is that it allows you to modify your site’s layout, features, and styles without altering the original files of the parent theme. This means that when the parent theme is updated, your customizations remain intact.
Example: If you are using the popular Astra theme and want to change certain elements like colors or fonts, creating a child theme ensures that these customizations will not be overwritten during theme updates.
Why Should You Use a Child Theme?
There are several reasons why you should use a child theme instead of directly editing your parent theme:
- Update-Safe Customizations: Any changes made to the parent theme’s files will be lost when it’s updated. A child theme ensures that updates do not affect your customizations.
- Easy Code Management: Using a child theme keeps your code organized. All modifications are stored separately from the parent theme’s files.
- Simple Reversions: If you make a mistake or want to remove a customization, you can easily revert it by modifying the child theme without disrupting the parent theme.
How to Create a Child Theme in WordPress with the Child Theme Configurator Plugin
Now, let’s dive into the steps to create a child theme using Child Theme Configurator—one of the most popular plugins for this task. This method is beginner-friendly and doesn’t require any coding knowledge.
Step 1: Install and Activate the Child Theme Configurator Plugin
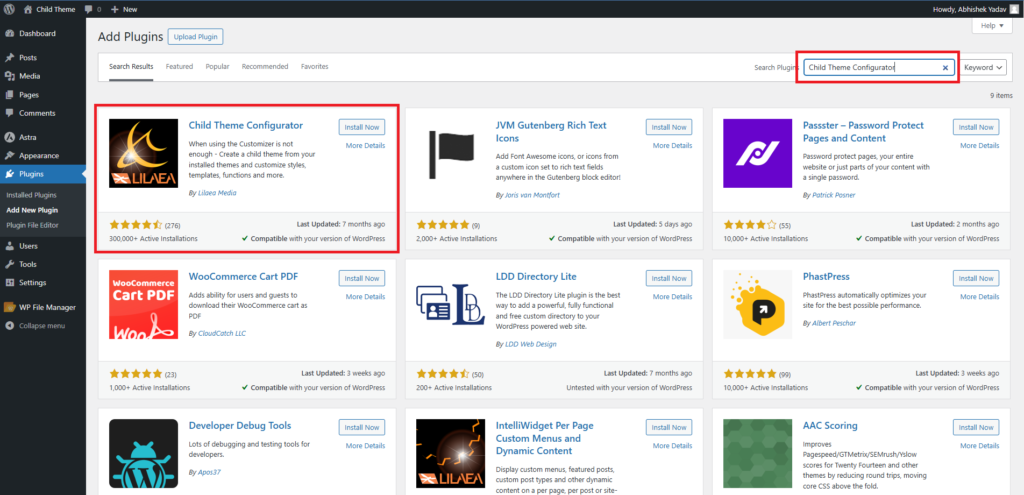
The first step is to install the Child Theme Configurator plugin from the WordPress plugin repository. Here’s how:
- Go to your WordPress dashboard.
- Navigate to Plugins > Add New.
- In the search bar, type “Child Theme Configurator”
- Once the plugin appears, click Install and then Activate.
Step 2: Analyze the Parent Theme
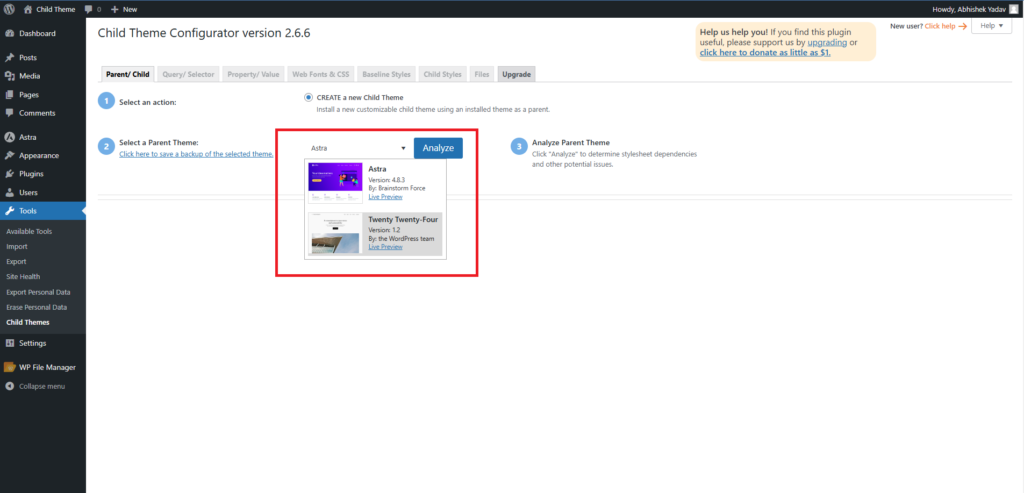
After activating the plugin, go to Tools > Child Themes. From here, you’ll need to select your parent theme (such as Astra, GeneratePress, or OceanWP) from the dropdown menu.
Click the Analyze button to check if the parent theme is compatible with creating a child theme. The plugin will confirm if the theme is suitable for a child theme.
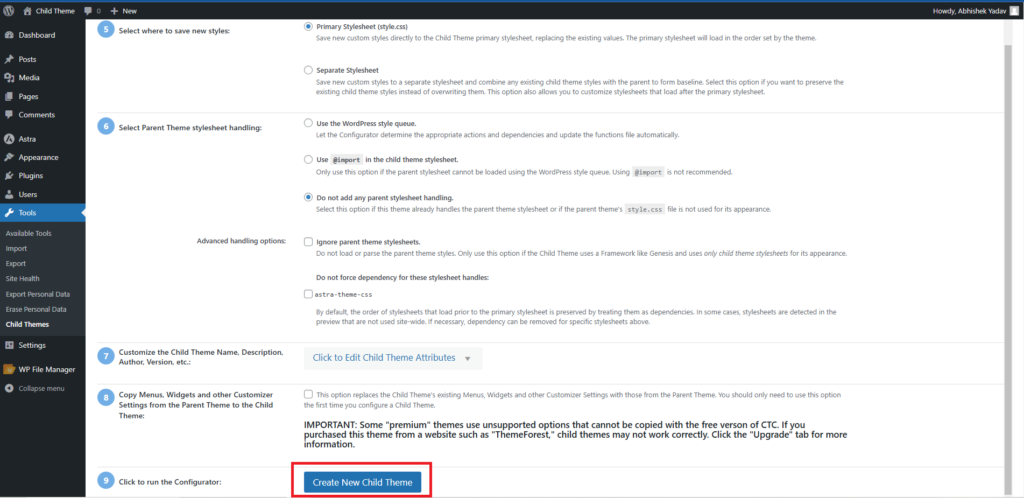
Step 3: Configure the Child Theme
Once the analysis is complete, you’ll be prompted to configure your child theme. Here’s what you need to do:
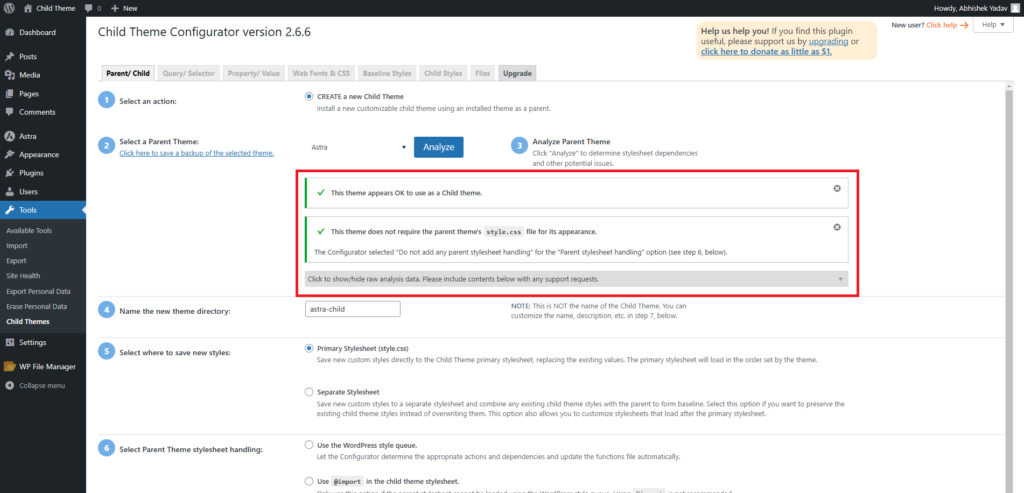
- Choose how to handle the parent theme’s styles (CSS). You can either let the child theme inherit the parent theme’s CSS or customize it further.
- You can also customize settings such as the theme name and directory.
Click Create New Child Theme to finalize the process.
Step 4: Activate and Customize Your Site with the Child Theme
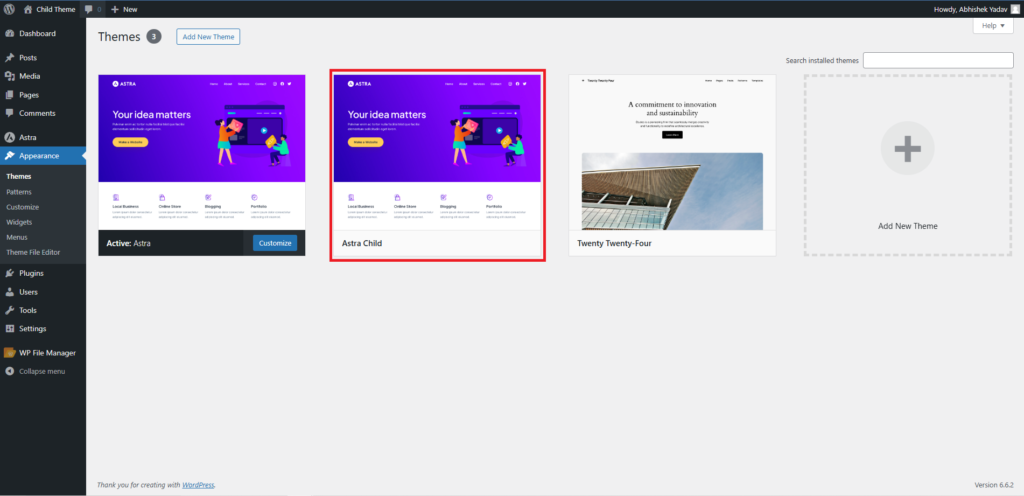
Once the child theme is created, you’ll need to activate it to start using it. Go to Appearance > Themes and select the newly created child theme. Click on the Activate button. Now, you can begin making customizations to your site’s design, either through the WordPress Customizer or by editing the theme’s code directly.
Tip: Although the plugin handles the child theme setup, you can still access the style.css and functions.php files for more advanced modifications.
Step 5: Test Your Website
Before making your child theme live, it’s essential to test your website thoroughly. Check the responsiveness, load times, and functionality across different devices. Ensure that all customizations are working as expected.
Comparison: Creating a Child Theme with a Plugin vs. Manually
While using a plugin like Child Theme Configurator is simple and quick, it’s important to know how this method compares to creating a child theme manually. For a more detailed guide on how to create a child theme manually, you can refer to this blog post.
| Aspect | With Plugin (Child Theme Configurator) | Without Plugin (Manual Method) |
|---|---|---|
| Ease of Use | Beginner-friendly, no coding required | Requires basic coding knowledge |
| Time Required | Quick (5-10 minutes) | Takes slightly longer (10-20 minutes) |
| Customization Options | Limited to plugin settings | Full control over customization |
| Potential Errors | Low risk of mistakes | Higher chance of errors if coding incorrectly |
| Flexibility | Suitable for simple customizations | Offers more flexibility for advanced customizations |
As you can see, the plugin method is ideal for beginners and those who want a fast solution. However, if you’re looking for more control over your theme’s functionality and design, the manual method is a better choice.
Conclusion
Creating a child theme in WordPress is a smart way to ensure that your customizations are safe from updates. With the Child Theme Configurator plugin, the process is streamlined and accessible, even for beginners. However, if you prefer a more hands-on approach, creating a child theme manually offers more flexibility.
Regardless of the method you choose, taking the time to set up a child theme will save you a lot of headaches in the long run, especially when your parent theme updates. For more information on creating a child theme manually, check out this step-by-step guide.
We hope you find this article helpful. Feel free to explore our other posts on Mechcoders Blogs.
If you liked this article, then please subscribe to our YouTube Channel for WordPress video tutorials. You can also find us on Linkedin and Facebook.

